この記事は、オルターブース Advent Calendar 2019 5日目 MLBお兄さん からバトンを受け取って
オルターブース Advent Calendar 2019 6日目 の記事です。
今年の Advent Calendar 2019 は、本番環境でやらかしちゃった人 Advent Calendar 2019 - Qiita が大変人気のようですね。こんにちは、はるか昔、AWS CloudFormation の本番スタックを間違って消したことがある、森田です。やらかしてちゃったことってあります・・・よね?
さて、やらかしちゃったや、〇〇砲などで本番環境が正常に動作しない状態になったとき、サイトが無応答になると心配です。そんなとき Sorry Page に自動切り替えして「 メンテナンス中だよ ☆(・ω<) 」 と中の人を陰ながらフォローしてくれる Sorry Page は心強い味方です。サイトが限りなく落ちないようにする設計はいろいろとあるかと思いますが、限られた予算の中での Sorry Page は選択肢の一つだと考えています。
構成
そんな Sorry Page パターンを Azure Traffic Manager を使って構築してみたいと思います。今回はこの構成を作ってみます。
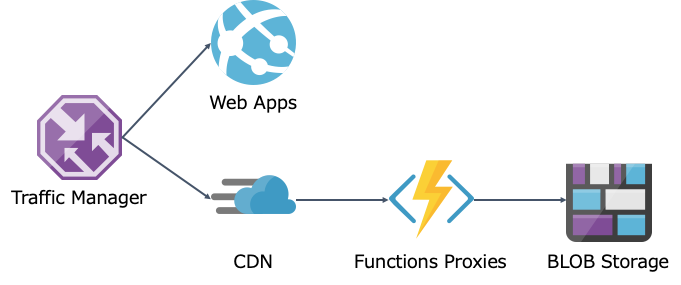
Web Apps が正常時はサイトホスティング、Blob Storage が 異常時にSorry Page をホスティンスします。
Traffic Manager
DNS レベルでトラフィックを制御します。Health Check により Web Apps に異常がおきると、Blob Storage の方へトラフィックを切り替えます。
Web Apps
ここでは Web Apps でなにかのサイトを本番ホスティング中というシナリオです。
CDN + Functions Proxies + Blob Storage
Blob Storage に Sorry Page を配置します。Blob Storage は単体で静的 Web サイトをホスティングできます。異常時にこの Sorry Page を表示しますが、Blob Storage だけでは Status Code 503 を返せません。そこで、Functions Proxies を挟んで Status Code をイジって 503 を返すようにします。Functions Proxies はアクセスが来たときだけ動いてくれればいいので、イベント単位での従量課金で動かします。Sorry Page を表示するために毎回イベントを発生させるのは勿体ないので、CDN を挟んで Sorry Page をキャッシュさせて、イベント発生回数を抑えます。
Let's Deploy
さて作ってきましょう。
Web Apps
Web Apps は東日本に作ります。
- Resouce Group 作成
az group create -n advent2019-rg -l japaneast
- App Service Plan 作成
az appservice plan create -n advent2019-asp -g advent2019-rg --sku P1V2 -l japaneast
- Web Apps 作成
az webapp create -n advent2019-web -g advent2019-rg -p advent2019-asp
- Web Apps にヘルスチェック用のファイル (
health.html) をデプロイします。
Static Web Site
Web Apps を東日本に作ったので、Blob Storage は西日本に作ります。もしものときの Sorry Page なのでリージョンは分けます。
- Storage Account 作成
az storage account create -n advent2019sorry -g advent2019-rg --sku Standard_LRS --kind StorageV2 --https-only false -l japanwest
- Static Web Site 設定
az storage blob service-properties update --account-name advent2019sorry --static-website --404-document 404.html --index-document index.html
- Sorry Page を Blob へアップロード
az storage blob upload-batch -s sorry -d \$web --account-name advent2019sorry
- Static Web Site URL 取得
az storage account show -n advent2019sorry -g advent2019-rg --query "primaryEndpoints.web" -o tsv
Static Web Site ができたので、ブラウザで Static Web Site へアクセスしてみます。
Functions Proxies
Status Code を書き換えるために Functions Proxies を作成します。
- Storage Account 作成
az storage account create -n advent2019sorryfunc -g advent2019-rg -l japanwest --sku Standard_LRS
- Function Apps 作成
az functionapp create -n advent2019sorry-func -g advent2019-rg -s advent2019sorryfunc --consumption-plan-location japanwest
- 全ての要求を 503 として Proxy 設定
- Backend URL に Static Web Site を指定
- Status Code 503 を指定

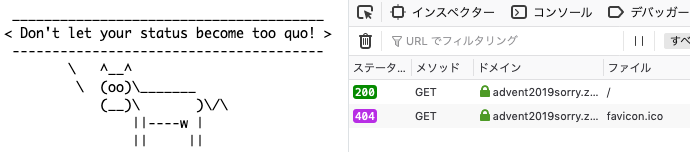
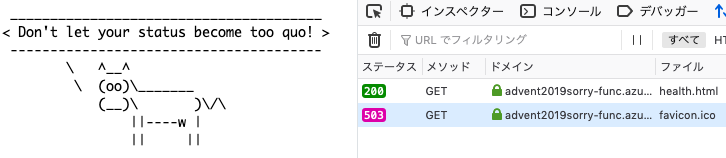
ブラウザで Proxy へアクセスしてみます。
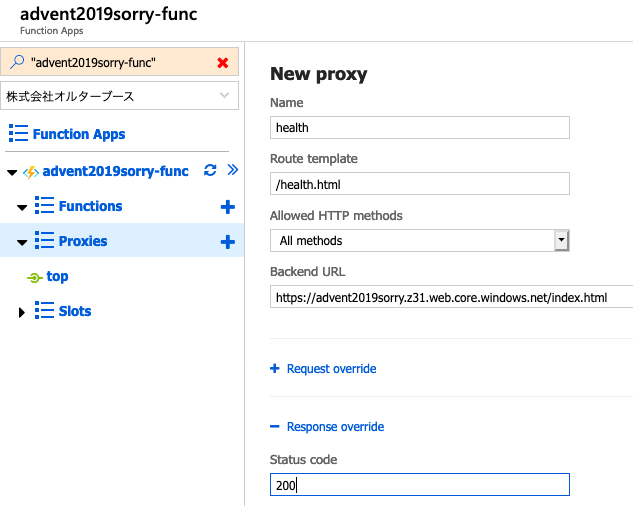
- Health チェック用のファイルは 200 として Proxy 設定
- Backend URL に Static Web Site を指定
- Status Code 200 を指定
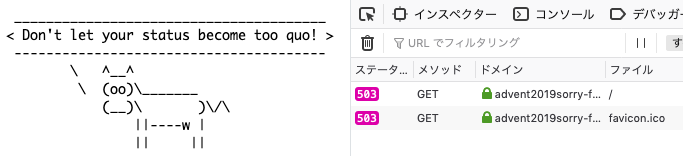
ブラウザで Proxy へアクセスしてみます。
CDN
Static Web Site の内容を CDN にキャッシュさせます。
- CDN Profile 作成
az cdn profile create -n advent2019sorry-cdnprofile -g advent2019-rg --sku Standard_Microsoft
- Proxy を Origin とする CDN Endpoint 作成
az cdn endpoint create -n advent2019sorry-cdnendpoint -g advent2019-rg --profile-name advent2019sorry-cdnprofile --origin advent2019sorry-func.azurewebsites.net --origin-host-header advent2019sorry-func.azurewebsites.net
Traffic Manager
Web Apps と Static Web Site の準備ができたので、Traffic Manager で優先度によるトラフィック制御をします。
- Traffic Manger Profile 作成
az network traffic-manager profile create -n advent2019-tm -g advent2019-rg --routing-method Priority --unique-dns-name advent2019 --path "/health.html"
- Web Apps の Traffic Manager Endpoint 作成
MyWebAppId=`az webapp show -g advent2019-rg -n advent2019-web --query id -o tsv`
az network traffic-manager endpoint create -n app -g advent2019-rg --profile-name advent2019-tm --type azureEndpoints --target-resource-id $MyWebAppId --priority 1
- Sorry の Traffic Manager Endpoint 作成
MyWebAppId=`az cdn endpoint show -n advent2019sorry-cdnendpoint -g advent2019-rg --profile-name advent2019sorry-cdnprofile --query hostName -o tsv`
az network traffic-manager endpoint create -n sorry -g advent2019-rg --profile-name advent2019-tm --type externalEndpoints --target $MyWebAppId --priority 2
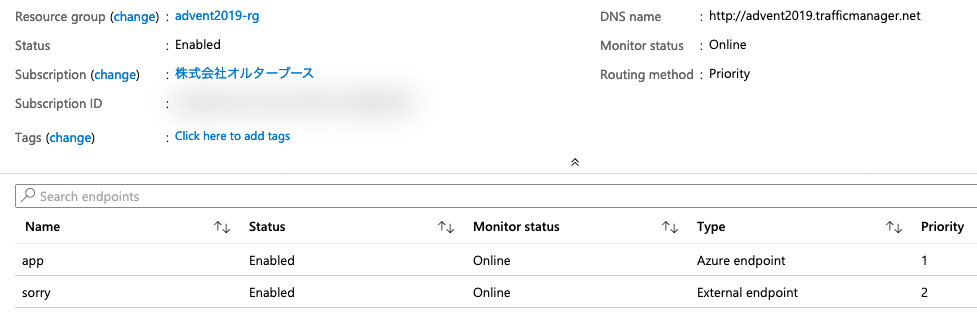
設定が終わり Traffic Manger による エンドポイントの Health チェックが正常となると、この状態になります。
動作確認
以上で設定は完了です。Traffic Manager にブラウザでアクセスすれば Web Apps が見えます。次に Web Apps の停止もしくは Web Apps の health.html を削除すると、Sorry Page に切り替わることが確認できます。他の確認の方法としては、nslookup などで Traffic Manger の DNS を覗いてみるのもありです。
まとめ
この構成なら月額10円的な使い方で Serverless に Sorry Page を用意することができました。アプリケーションサーバーになにかしらトラブルが発生した際に、自動的に Sorry Page に切り替わるようになります。低コストで Sorry Page を用意する一つの方法として参考になれば、きっとやらかしちゃった人も報われます。
それでは、オルターブース Advent Calendar 2019 7日目 もお楽しみに! adventar.org


