こんにちは。MLBお兄さんこと松村です。
随分ネタを寝かせてしまいましたが、Azure Active Directory B2CでLINEログインを使用するための検証結果の記事を書きます。
Azure Active Directory B2C (以下 AAD B2C) は、Azureが提供する認証やID管理のためのサービスです。
docs.microsoft.com
AAD B2CはIDプロバイダーとして、FacebookやTwitterなど外部サービスが提供するIDプロバイダーを使用することができます。
今回は公式には用意されていない「LINEログイン」をAAD B2CのIDプロバイダーとして利用するための設定を紹介します。
手順
- AAD B2Cテナントの作成
- AAD B2Cにアプリケーションの登録
- LINEログインの作成
- AAD B2Cのカスタムポリシーの作成
1. AAD B2Cのリソースの作成
こちらのドキュメントの通りに、AAD B2Cのテナントを作成します。
docs.microsoft.com
AAD B2Cのテナント名は後で使用するので控えておきましょう。
2. AAD B2Cにアプリケーションの登録
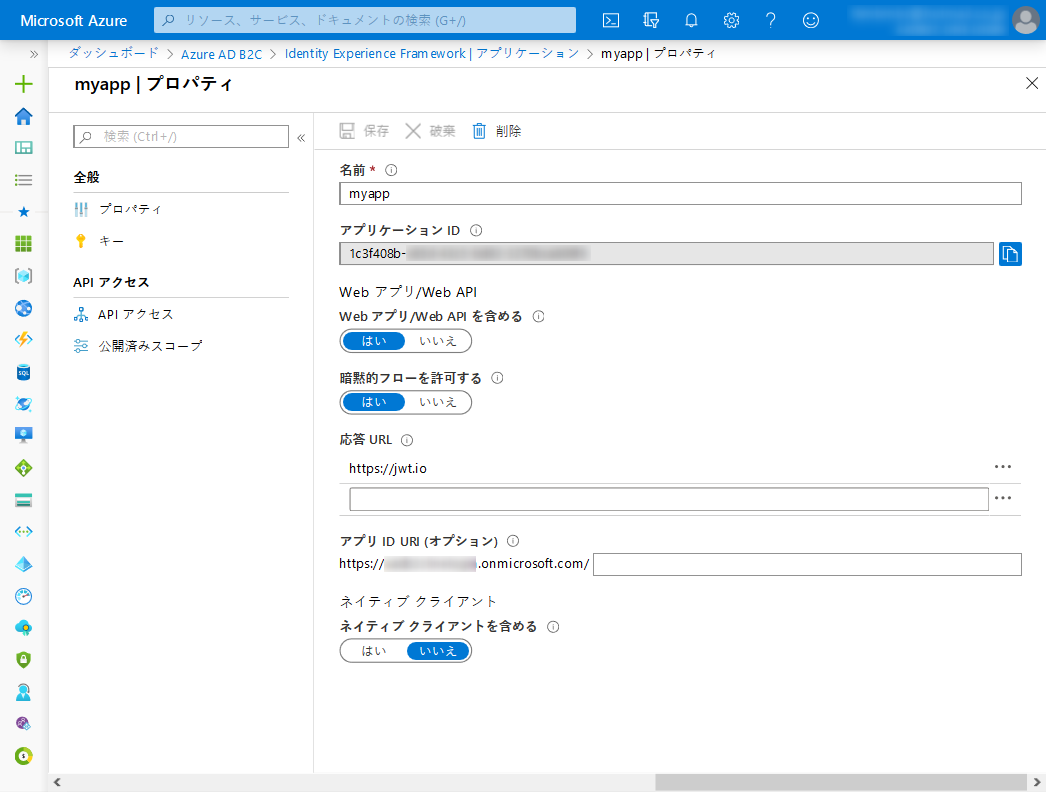
作成したAAD B2Cのテナントにて、認証の際に使用するアプリケーションを登録します。
docs.microsoft.com
このとき応答URLには、AAD B2Cで生成されるJWT形式のアクセストークンを確認するために https://jwt.ms を指定しましょう。
また、アプリケーションの登録後に生成されるアプリケーションIDは後で使用するので控えておきましょう。
3. LINEログインの作成
次に https://developers.line.biz でLINEログインのチャネルを作成します。
なお作成したLINEログインチャネルの「チャネルID」と「チャネルシークレット」は、以降の手順で使用しますので控えておきましょう。
またLINEログインチャネルの設定画面の「LINEログイン設定」タブにあるコールバックURLに下記の値を入力します。
https://{your-tenant-name}.b2clogin.com/{your-tenant-name}.onmicrosoft.com/oauth2/authresp
※ {your-tenant-name} はご自身が作成したAAD B2Cのテナント名に置き換えてください。
4. AAD B2Cのカスタムポリシーの作成
AAD B2Cでは既定で用意されていないIDプロバイダー(IdP)も、カスタムIdPとして登録することができます。
ただしLINEログインはカスタムIdPとして登録することができなかったため、カスタムポリシーのなかで登録していきます。
なお、AAD B2Cのカスタムポリシーは最初は癖があると思うので、こちらのブログがおすすめです。
blog.azure.moe
署名および暗号化キーの追加
こちらのドキュメントに沿って、カスタムポリシーで使用する署名と暗号化キーを追加します。
docs.microsoft.com
B2C_1A_TokenSigningKeyContainer- 署名キー
B2C_1A_TokenEncryptionKeyContainer- 暗号化キー
B2C_1A_LineLoginSecret- オプション:手動
- 名前:
B2C_1A_LineLoginSecret - シークレット:LINEログインのチャネルシークレット
- キー使用法:署名
カスタムポリシーの準備
テンプレートのダウンロード
今回はこちらをカスタムポリシーのファイルをベースとして、LINEログイン用のカスタムポリシーを作成していきます。
github.com
この記事ではサインアップとサインインのみ確認するため、3つのファイルにフォーカスします。
- TrustFrameworkBase.xml
- ベースファイル
- TrustFrameworkExtensions.xml
- 拡張ファイル
- SignUpOrSignin.xml
- サインアップおよびサインインのポリシーファイル
テナント名の置き換え
ダウンロードしたすべてのXMLファイルにある yourtenant を、作成したAAD B2Cのテナント名に置き換えます。
ベースファイルから不要な要素の削除
TrustFrameworkBase.xmlには今回の記事では使用しないFacebookログインの設定が入っています。
FacebookとつくClaimsProviderとClaimsExchangeを削除します。
編集が終わったベースファイルはAAD B2Cにアップロードします。
拡張ファイルにLINEログインの定義
TrustFrameworkExtensions.xmlの<ClaimsProviders>の中に以下を追加します。
なお{your-line-login-channel-id}は自身のLINEログインのチャネルIDに置き換えてください。
編集が終わった拡張ファイルはAAD B2Cにアップロードします。
    <ClaimsProvider>
      <Domain>line.me</Domain>
      <DisplayName>LINE</DisplayName>
      <TechnicalProfiles>
        <TechnicalProfile Id="LINE-OAUTH">
          <DisplayName>LINE</DisplayName>
          <Protocol Name="OAuth2" />
          <Metadata>
            <Item Key="ProviderName">line</Item>
            <Item Key="authorization_endpoint">https://access.line.me/oauth2/v2.1/authorize</Item>
            <Item Key="AccessTokenEndpoint">https://api.line.me/oauth2/v2.1/token</Item>
            <Item Key="ClaimsEndpoint">https://api.line.me/v2/profile</Item>
            <Item Key="scope">openid profile</Item>
            <Item Key="HttpBinding">POST</Item>
            <Item Key="external_user_identity_claim_id">id</Item>
            <Item Key="BearerTokenTransmissionMethod">AuthorizationHeader</Item>
            <Item Key="ResolveJsonPathsInJsonTokens">true</Item>
            <Item Key="UsePolicyInRedirectUri">0</Item>
            <Item Key="AccessTokenResponseFormat">json</Item>
            <Item Key="client_id">{your-line-login-channel-id}</Item>
          </Metadata>
          <CryptographicKeys>
            <Key Id="client_secret" StorageReferenceId="B2C_1A_LineLoginSecret" />
          </CryptographicKeys>
          <InputClaims />
          <OutputClaims>
            <OutputClaim ClaimTypeReferenceId="issuerUserId" PartnerClaimType="userId" />
            <OutputClaim ClaimTypeReferenceId="givenName" PartnerClaimType="first_name" />
            <OutputClaim ClaimTypeReferenceId="surname" PartnerClaimType="last_name" />
            <OutputClaim ClaimTypeReferenceId="displayName" PartnerClaimType="name" />
            <OutputClaim ClaimTypeReferenceId="email" PartnerClaimType="email" />
            <OutputClaim ClaimTypeReferenceId="identityProvider" DefaultValue="line.me" AlwaysUseDefaultValue="true" />
            <OutputClaim ClaimTypeReferenceId="authenticationSource" DefaultValue="socialIdpAuthentication" AlwaysUseDefaultValue="true" />
          </OutputClaims>
          <OutputClaimsTransformations>
            <OutputClaimsTransformation ReferenceId="CreateRandomUPNUserName" />
            <OutputClaimsTransformation ReferenceId="CreateUserPrincipalName" />
            <OutputClaimsTransformation ReferenceId="CreateAlternativeSecurityId" />
          </OutputClaimsTransformations>
          <UseTechnicalProfileForSessionManagement ReferenceId="SM-SocialLogin" />
        </TechnicalProfile>
      </TechnicalProfiles>
    </ClaimsProvider>
<UserJourneys>の中に以下を追加します。
    <UserJourney Id="SignUpOrSignIn">
      <OrchestrationSteps>

        <OrchestrationStep Order="1" Type="CombinedSignInAndSignUp" ContentDefinitionReferenceId="api.signuporsignin">
          <ClaimsProviderSelections>
            <ClaimsProviderSelection TargetClaimsExchangeId="LineExchange" />
            <ClaimsProviderSelection ValidationClaimsExchangeId="LocalAccountSigninEmailExchange" />
          </ClaimsProviderSelections>
          <ClaimsExchanges>
            <ClaimsExchange Id="LocalAccountSigninEmailExchange" TechnicalProfileReferenceId="SelfAsserted-LocalAccountSignin-Email" />
          </ClaimsExchanges>
        </OrchestrationStep>

        <!-- Check if the user has selected to sign in using one of the social providers -->
        <OrchestrationStep Order="2" Type="ClaimsExchange">
          <Preconditions>
            <Precondition Type="ClaimsExist" ExecuteActionsIf="true">
              <Value>objectId</Value>
              <Action>SkipThisOrchestrationStep</Action>
            </Precondition>
          </Preconditions>
          <ClaimsExchanges>
            <ClaimsExchange Id="LineExchange" TechnicalProfileReferenceId="LINE-OAUTH" />
            <ClaimsExchange Id="SignUpWithLogonEmailExchange" TechnicalProfileReferenceId="LocalAccountSignUpWithLogonEmail" />
          </ClaimsExchanges>
        </OrchestrationStep>

        <!-- For social IDP authentication, attempt to find the user account in the directory. -->
        <OrchestrationStep Order="3" Type="ClaimsExchange">
          <Preconditions>
            <Precondition Type="ClaimEquals" ExecuteActionsIf="true">
              <Value>authenticationSource</Value>
              <Value>localAccountAuthentication</Value>
              <Action>SkipThisOrchestrationStep</Action>
            </Precondition>
          </Preconditions>
          <ClaimsExchanges>
            <ClaimsExchange Id="AADUserReadUsingAlternativeSecurityId" TechnicalProfileReferenceId="AAD-UserReadUsingAlternativeSecurityId-NoError" />
          </ClaimsExchanges>
        </OrchestrationStep>

        <!-- Show self-asserted page only if the directory does not have the user account already (i.e. we do not have an objectId).
          This can only happen when authentication happened using a social IDP. If local account was created or authentication done
          using ESTS in step 2, then an user account must exist in the directory by this time. -->
        <OrchestrationStep Order="4" Type="ClaimsExchange">
          <Preconditions>
            <Precondition Type="ClaimsExist" ExecuteActionsIf="true">
              <Value>objectId</Value>
              <Action>SkipThisOrchestrationStep</Action>
            </Precondition>
          </Preconditions>
          <ClaimsExchanges>
            <ClaimsExchange Id="SelfAsserted-Social" TechnicalProfileReferenceId="SelfAsserted-Social" />
          </ClaimsExchanges>
        </OrchestrationStep>

        <!-- This step reads any user attributes that we may not have received when authenticating using ESTS so they can be sent
          in the token. -->
        <OrchestrationStep Order="5" Type="ClaimsExchange">
          <Preconditions>
            <Precondition Type="ClaimEquals" ExecuteActionsIf="true">
              <Value>authenticationSource</Value>
              <Value>socialIdpAuthentication</Value>
              <Action>SkipThisOrchestrationStep</Action>
            </Precondition>
          </Preconditions>
          <ClaimsExchanges>
            <ClaimsExchange Id="AADUserReadWithObjectId" TechnicalProfileReferenceId="AAD-UserReadUsingObjectId" />
          </ClaimsExchanges>
        </OrchestrationStep>
        <!-- The previous step (SelfAsserted-Social) could have been skipped if there were no attributes to collect
             from the user. So, in that case, create the user in the directory if one does not already exist
             (verified using objectId which would be set from the last step if account was created in the directory. -->
        <OrchestrationStep Order="6" Type="ClaimsExchange">
          <Preconditions>
            <Precondition Type="ClaimsExist" ExecuteActionsIf="true">
              <Value>objectId</Value>
              <Action>SkipThisOrchestrationStep</Action>
            </Precondition>
          </Preconditions>
          <ClaimsExchanges>
            <ClaimsExchange Id="AADUserWrite" TechnicalProfileReferenceId="AAD-UserWriteUsingAlternativeSecurityId" />
          </ClaimsExchanges>
        </OrchestrationStep>

        <OrchestrationStep Order="7" Type="SendClaims" CpimIssuerTechnicalProfileReferenceId="JwtIssuer" />

      </OrchestrationSteps>
      <ClientDefinition ReferenceId="DefaultWeb" />
    </UserJourney>
サインアップおよびサインインのポリシーファイルのアップロード
SignUpOrSignin.xmlは特に変更せずにAAD B2Cにアップロードします。
動作確認
エラーなく3つのファイルをアップロードできたら、AAD B2Cのポータル画面に戻り、Identity Experience Frameworkを見てみます。
カスタムポリシーの欄にアップロードした3つのポリシーが表示されていることを確認します。
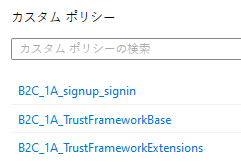
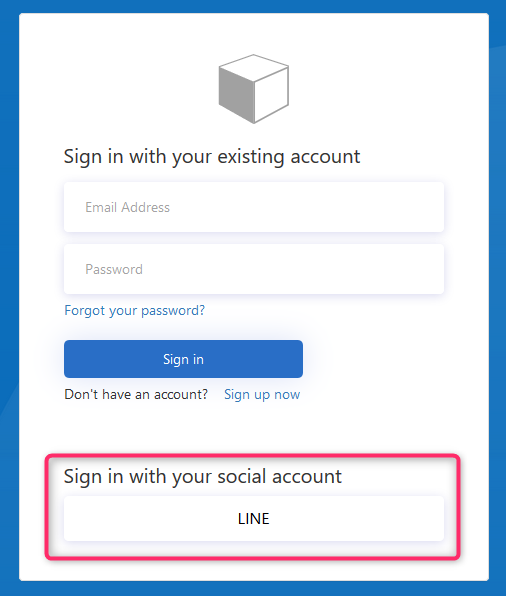
B2C_1A_signup_signinをクリックし、2で作成したアプリケーションを選択して「今すぐ実行」をクリックします。
サインイン画面が表示され、LINEでログインするためのボタンが表示されていることが確認できました!
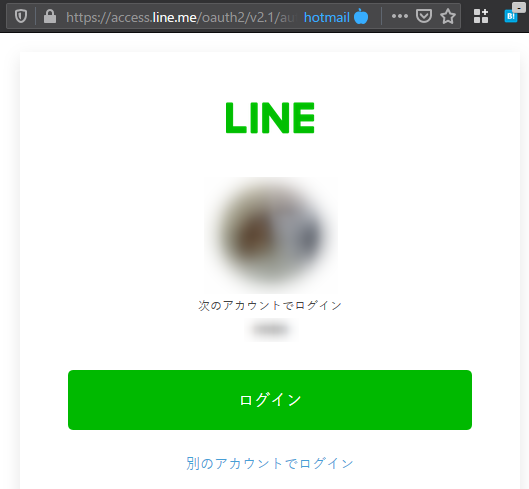
LINEのボタンをクリックするとLINEログインの画面に遷移します。(URLもaccess.line.meになってますよね)
最後に自分のLINEアカウントでログインするとjwt.msにリダイレクトして、アクセストークンが取得でき、自分のLINEアカウントの情報を含んだクレームであることを確認しましょう。
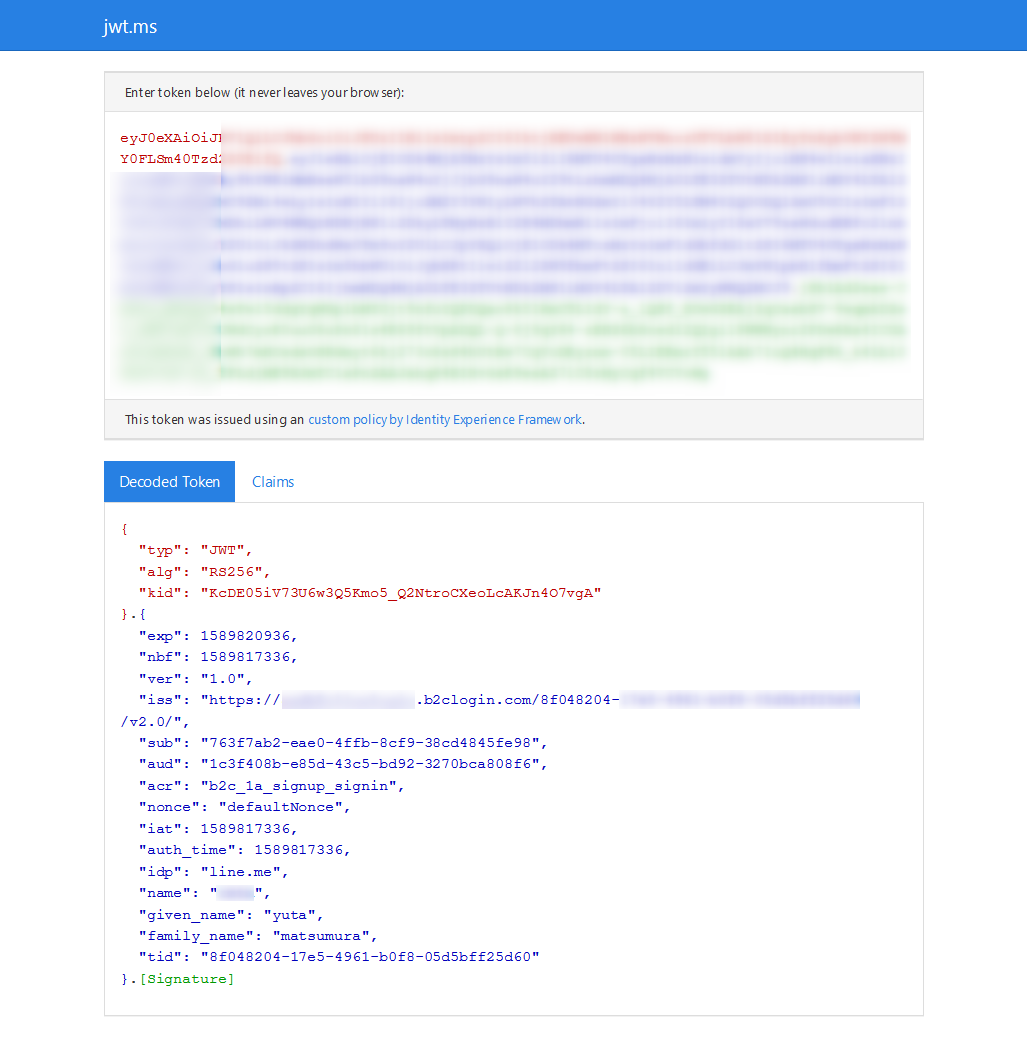
これでAAD B2CにLINEログインを実装する作業が終わりました。お疲れ様でした。
あとは全体的なアーキテクチャーやアプリケーションに合わせて、返却するクレームなどをカスタマイズしていきましょう。


